Search
Goal
Bring DICOM studies into your project so they are de-identified and listed under View → Dataset. You can:
- Import from this computer — files or a folder via the File menu.
- Search a remote imaging system — PACS / VNA / Orthanc via Dashboard Search.
Configure the Query Server, modalities, storage classes, and network timeouts before you rely on remote Search.
From a folder or files
1. Open Import from the File menu
With a project open, use:
- File → Import Files — pick one or more files (default filter is often
.dcm; you can change it in the file dialog). - File → Import Directory — every file under that folder and its subfolders is attempted, not only
.dcm.
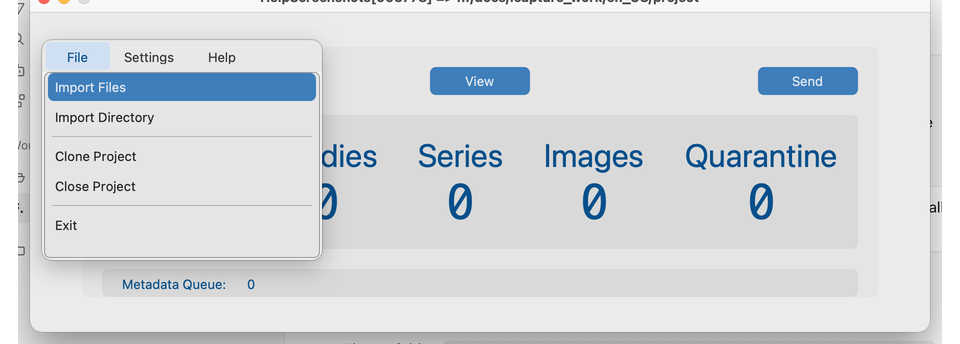
Already-imported instances (same SOP Instance UID already in this project) are skipped, not quarantined.
2. Choose a folder (Import Directory)
After Import Directory, the OS folder dialog opens. Navigate to your study tree and click Choose.
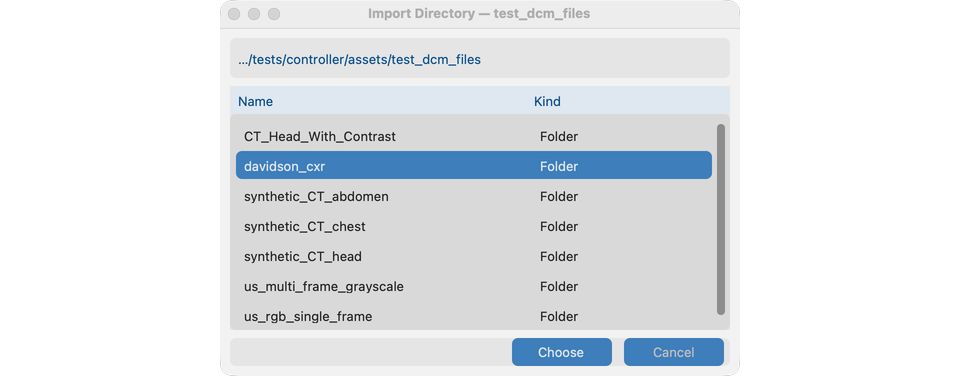
Navigate to tests/controller/assets/test_dcm_files (or a study folder under it such as davidson_cxr or CT_Head_With_Contrast).
3. What must be true for a file to import
A file is accepted only if all of these hold:
- Valid DICOM Part 10 file with file meta information (including the DICOM preamble).
- Contains SOP Class UID, Study Instance UID, Series Instance UID, and SOP Instance UID.
- Its storage class is allowed by this project’s storage classes.
- Protected identity (PHI) can be captured successfully.
- It has not already been imported into this project.
If a patient lookup table is required, the PHI Patient ID must also match an entry—or the file is quarantined as Lookup_Miss.
4. Import davidson_cxr (single study demo)
Demo chest X-ray used later in View and Remove Pixel PHI.
Path: tests/controller/assets/test_dcm_files/davidson_cxr
- Choose File → Import Directory.
- Select the
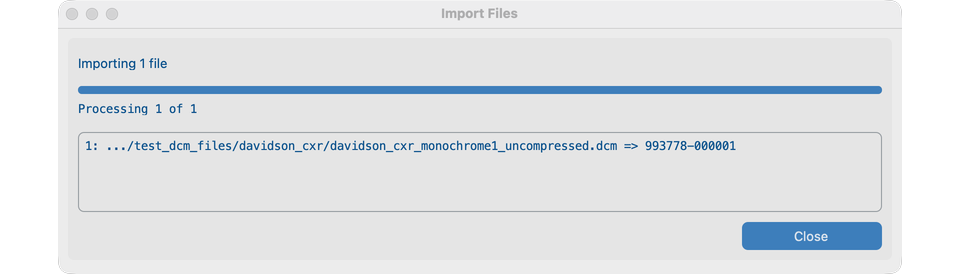
davidson_cxrfolder and click Choose. - Wait until the Import Files dialog finishes and Close appears.
A successful line shows an abridged path and PHI Patient ID → anonymized Patient ID (for example …/davidson_cxr_….dcm => 993627-000001).
5. Read the import log (many files)
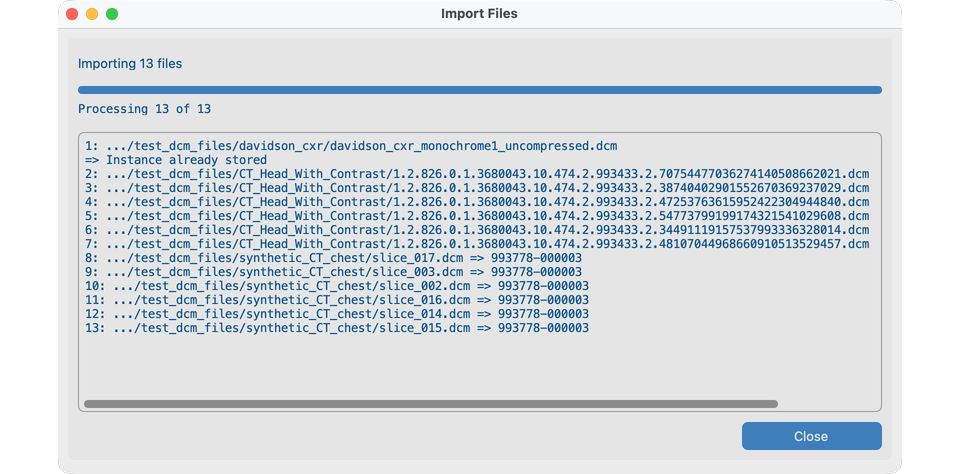
When you import a larger tree, the same dialog lists one outcome per file in the scrollable box:
- Success:
path => anonymized Patient ID - Already stored: skipped (same SOP Instance UID)
- Failure:
paththen=>and a short reason (invalid DICOM, missing attributes, storage class, PHI capture, lookup miss)
Click Close when finished. Dashboard patient / study / image counts update; quarantine counts rise only for rejected files.
Quarantine
Failed files land under the project’s private quarantine folders (names may appear with spaces or underscores in the UI):
| Folder | Typical cause |
|---|---|
Invalid_DICOM / DICOM read error |
Not valid DICOM, or unreadable |
Missing_Attributes |
Required UIDs / SOP Class missing |
Invalid_Storage_Class |
Storage class not enabled for the project |
Capture_PHI_Error |
Could not capture PHI |
Lookup_Miss |
Patient ID not in the lookup table |
Review quarantine counts on the Dashboard. Fix settings or source files, then import again.
From a remote imaging system (Dashboard Search)
1. Open Search
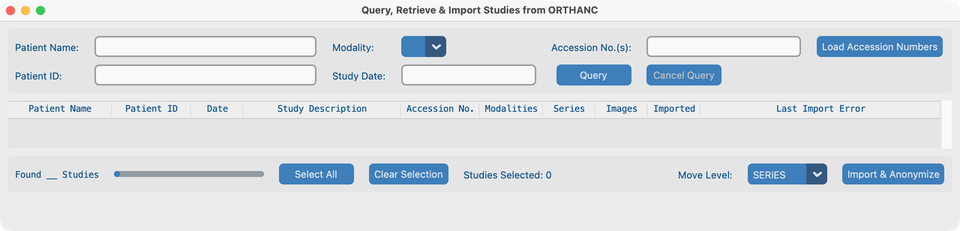
On the Dashboard, click Search. The app first C-ECHOs the configured Query Server. If the echo succeeds, the Query, Retrieve & Import window opens.
This window has three bands:
- Criteria — Patient Name, Patient ID, Modality, Study Date, Accession No.(s), Load Accession Numbers, Query / Cancel Query, Show Imported Studies.
- Results table — studies returned by C-FIND.
- Import bar — Found count, Select All / Clear Selection, Move Level, Import & Anonymize.
Ask IT for help
The Query Server must allow this computer to C-ECHO, C-FIND, and C-MOVE, and must know your Local Server (address, port, AE Title) as the C-MOVE destination. See Create a project → When you talk to IT.
2. Search for studies
Enter at least one criterion, then click Query (or press Return). An empty query is rejected.
| Field | Notes |
|---|---|
| Patient Name | Letters (including accents), digits, ^ name separator; ? = one character, * = any string |
| Patient ID | ASCII letters/digits; ? and * wildcards |
| Modality | Dropdown from modalities configured in Project Settings |
| Study Date | One day or a range: YYYYMMDD or YYYYMMDD-YYYYMMDD |
| Accession No.(s) | ASCII, digits, and / - _ , .; ? and * wildcards |
Extra accession options:
- Type a comma-separated list in Accession No.(s) to run several searches in one go.
- Use Load Accession Numbers to load a
.txtor.csvfile (comma- or line-delimited). Confirm before the bulk query runs. Accession numbers that are not found can be written to a text file for follow-up.
Other controls:
- Show Imported Studies — when off, studies already in this project are hidden from the results list.
- Cancel Query — stops an in-progress query.
- Only studies whose modalities are allowed for the project appear and can be selected.
- Status at the bottom shows Found N Studies after a successful query.
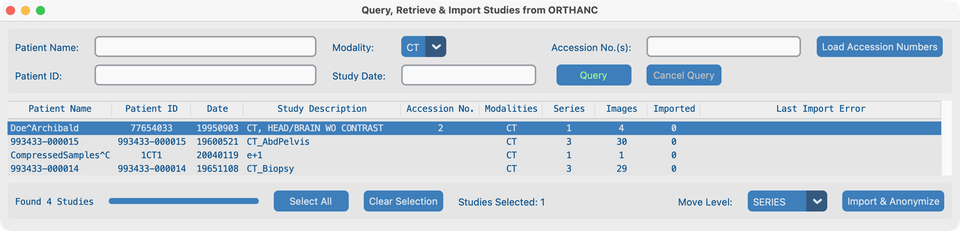
3. Example: CT query (Doe^Archibald)
- Set Modality to CT.
- Click Query.
- Click the Doe^Archibald head CT row (dark selection highlight).
- Confirm Studies Selected: 1 and choose Move Level (often STUDY or SERIES).
4. Select studies and import
- Select studies: single click, multi-select (⌘ / Ctrl+click), Select All, or Clear Selection.
- Choose Move Level: STUDY, SERIES, or INSTANCE (DICOM C-MOVE level). Prefer STUDY when the archive supports it; try SERIES or INSTANCE if transfers stall.
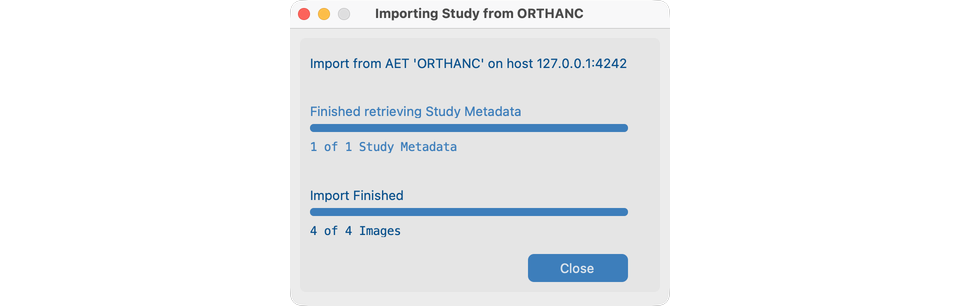
- Click Import & Anonymize. The app builds a study hierarchy for the selected move level, then opens the Import Studies progress dialog.
- Progress tracks metadata retrieval, then images received versus the hierarchy. A study finishes when all expected files arrive or a Network Timeout expires for that transfer.
- When the dialog shows Import Finished, click Close.
5. Confirm green highlight (CT series imported)
Successfully imported studies are highlighted green in the Query results list, and the Imported column shows how many images landed in the project. With Move Level = SERIES, the CT series for Doe^Archibald completes with Imported matching Images.
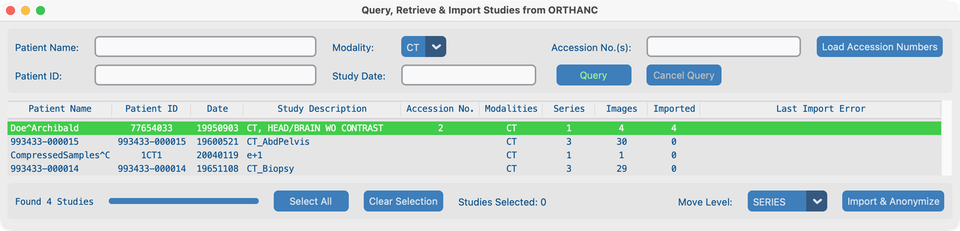
You can select the same studies again after adjusting timeout or move level—already-imported instances are skipped.
Handling slow or non-ideal archives
Many VNAs move images asynchronously and do not behave like a textbook PACS. If imports are incomplete:
- Lengthen Network Timeout in Project Settings.
- Change Move Level (Study → Series → Instance) and retry Import & Anonymize.
- Confirm with IT that C-MOVE destination matches your Local Server AE Title and that modalities / storage classes allow the studies you expect.
What good looks like
- Studies appear under View → Dataset.
- Dashboard patient / study / image counts increase; quarantine stays empty or only holds expected rejects.
- Local import dialogs show a clear success or error line per file before you click Close.
- Remote imports show green highlighting in Query results after a successful run.
- Status text at the bottom of the Dashboard reflects the last Search or import action.
If it fails
| Symptom | What to try |
|---|---|
| Search button stays disabled / echo fails | Query Server offline or blocked; verify address, port, AE Title with IT |
| Connection error on Query | C-ECHO failed—fix Query Server settings or network |
| Empty results | Broaden wildcards/date; turn on Show Imported Studies; check project modalities |
| Nothing imports from folder | Storage classes / modalities; valid Part 10 DICOM; Lookup table if required |
| Lookup_Miss | Add the Patient ID to the lookup table or relax lookup requirements |
| Partial PACS import | Longer Network Timeout; different Move Level; retry selection |
| Files ignored with no quarantine | Already imported (same SOP Instance UID) |
Next steps
Continue with View to browse what you imported.