8.3 Blur faces
On some head CT or MR exams, facial features could allow recognition even after tags are cleaned. Face de-identify blurs the face region and lets you review quality before keeping the result.
Demo series
CT_Head_With_Contrast — same series as 8.2 Harmonize names
(tests/controller/assets/test_dcm_files/CT_Head_With_Contrast).
Prefer Harmonize first so anatomy hints improve eligibility, then open face blur on this series.
Goal
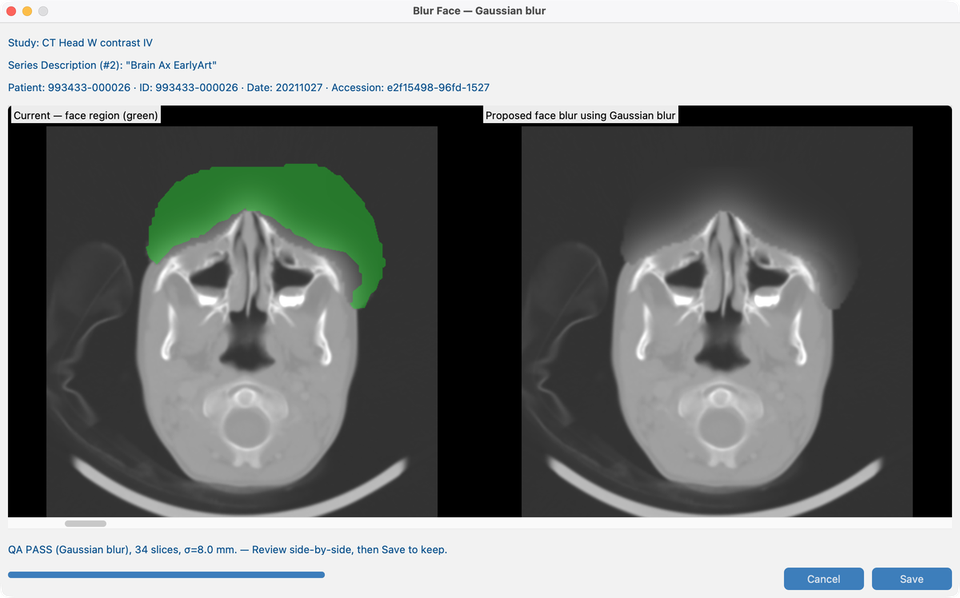
On CT_Head_With_Contrast, run face blur in Gaussian mode, review QA, and save if appropriate.
Before you start
- Complete AI Features setup — face models and academic license.
- Import
CT_Head_With_Contrast(and ideally finish Harmonize in 8.2). - Open the series in Series View.
Workflow on CT_Head_With_Contrast (Gaussian)
- Open
CT_Head_With_Contrastin Series View. - Start Face blur / preview.
- Set blur mode to Gaussian (common default for this demo).
- Review side-by-side: current image vs proposed blur; green outline shows the face region.
- Check QA PASS vs QA FAIL (pixels changed outside the mask).
- Save to keep, or discard.
Other blur modes
Batch and Series View may also offer median, pixelate, or fill noise. The documented demo uses Gaussian only.
Batch
See 8.4 Run on many studies. Non-head series are skipped.
What good looks like
- Face covered on
CT_Head_With_Contrast; anatomy outside the mask unchanged. - Dataset Face blur status updates.
If it fails
- Not a head series / insufficient face mask → skip or run Harmonize first (8.2).
- Already applied → will not re-blur unless you use a deliberate re-run path.
- QA FAIL → do not save; adjust mode or inspect mask.
- Tools greyed out → AI Features.
Next steps
Continue with 8.4 Run on many studies to batch these tools across a cohort.